
Create and Manage Webinars
Nimbu's Webinars feature lets trainers create, schedule, and host live online sessions directly inside the LMS. Sessions can be set up as standalone webinars (with their own enrolments and optional self-registration) or added to a class as part of its structure. Trainers host via integrated Zoom or by embedding a meeting link from a third-party tool such as Google Meet or Microsoft Teams. Enrolments, supporting documents, completion tracking, and join links all live alongside the rest of the course content.
What's covered in this article:
- Two ways to create a webinar: Standalone vs Webinar in Class
- Creating a Standalone Webinar: Webinar Info and Time & Settings
- Adding a Webinar to a Class
- Webinar statuses: Draft, Published, Inactive
- Editing and removing webinars
- Joining a webinar as a trainer
Who can do this: Trainers with Webinar Management permission who are assigned to the relevant class or webinar.
Before you begin: Confirm that an admin has successfully connected a Zoom account via Other Integrations. If Zoom is not connected, the Zoom option will not appear in the webinar setup form.
Two Ways to Create a Webinar
Trainers can create webinars in two places, depending on how the session fits into the RTO's delivery:
- Standalone Webinar: Created from the Webinars page in the left sidebar. Standalone webinars are independent sessions that can be linked to one or more classes, or made available for learners to self-register through the Course Catalog.
- Webinar in Class: Created directly inside a class from the Webinar & Structure tab. The webinar is created and attached to that specific class in a single step.
Choose Standalone when the session should be reusable, bookable by multiple cohorts, or offered as a paid or open event. Choose Webinar in Class when the session is a fixed part of a specific class's learning path.
Creating a Standalone Webinar
- From the left sidebar, select Webinars to open the Webinar Index.
- Click Add in the top right corner.
- Complete the Webinar Info tab:
- Code (Optional): A reference code shown to learners.
- Title (Required): The name of the webinar as learners will see it.
- Trainers (Required): Select the trainer(s) who will host the session.
- Webinar Description: A rich text description of what the webinar covers.
- Webinar Thumbnail: Upload a cover image (JPG or PNG, max 2 MB).
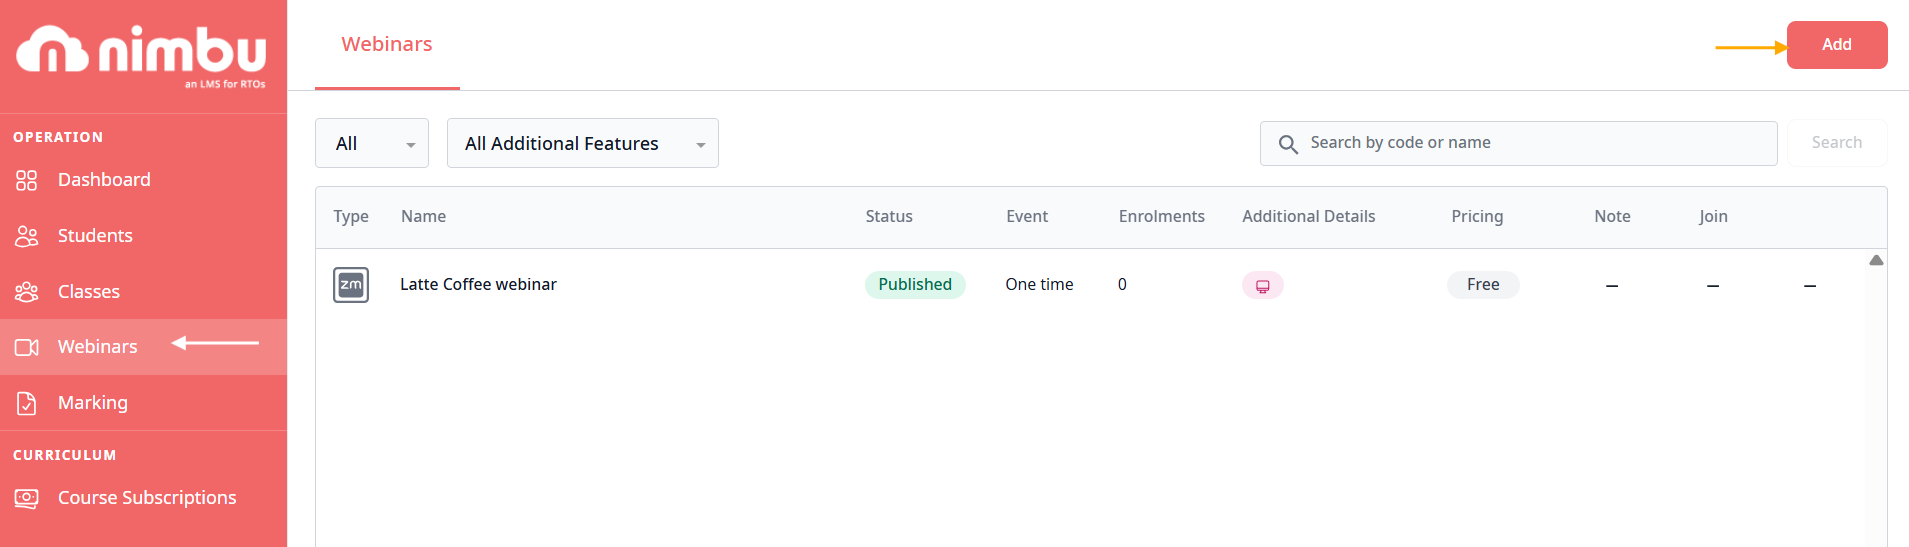
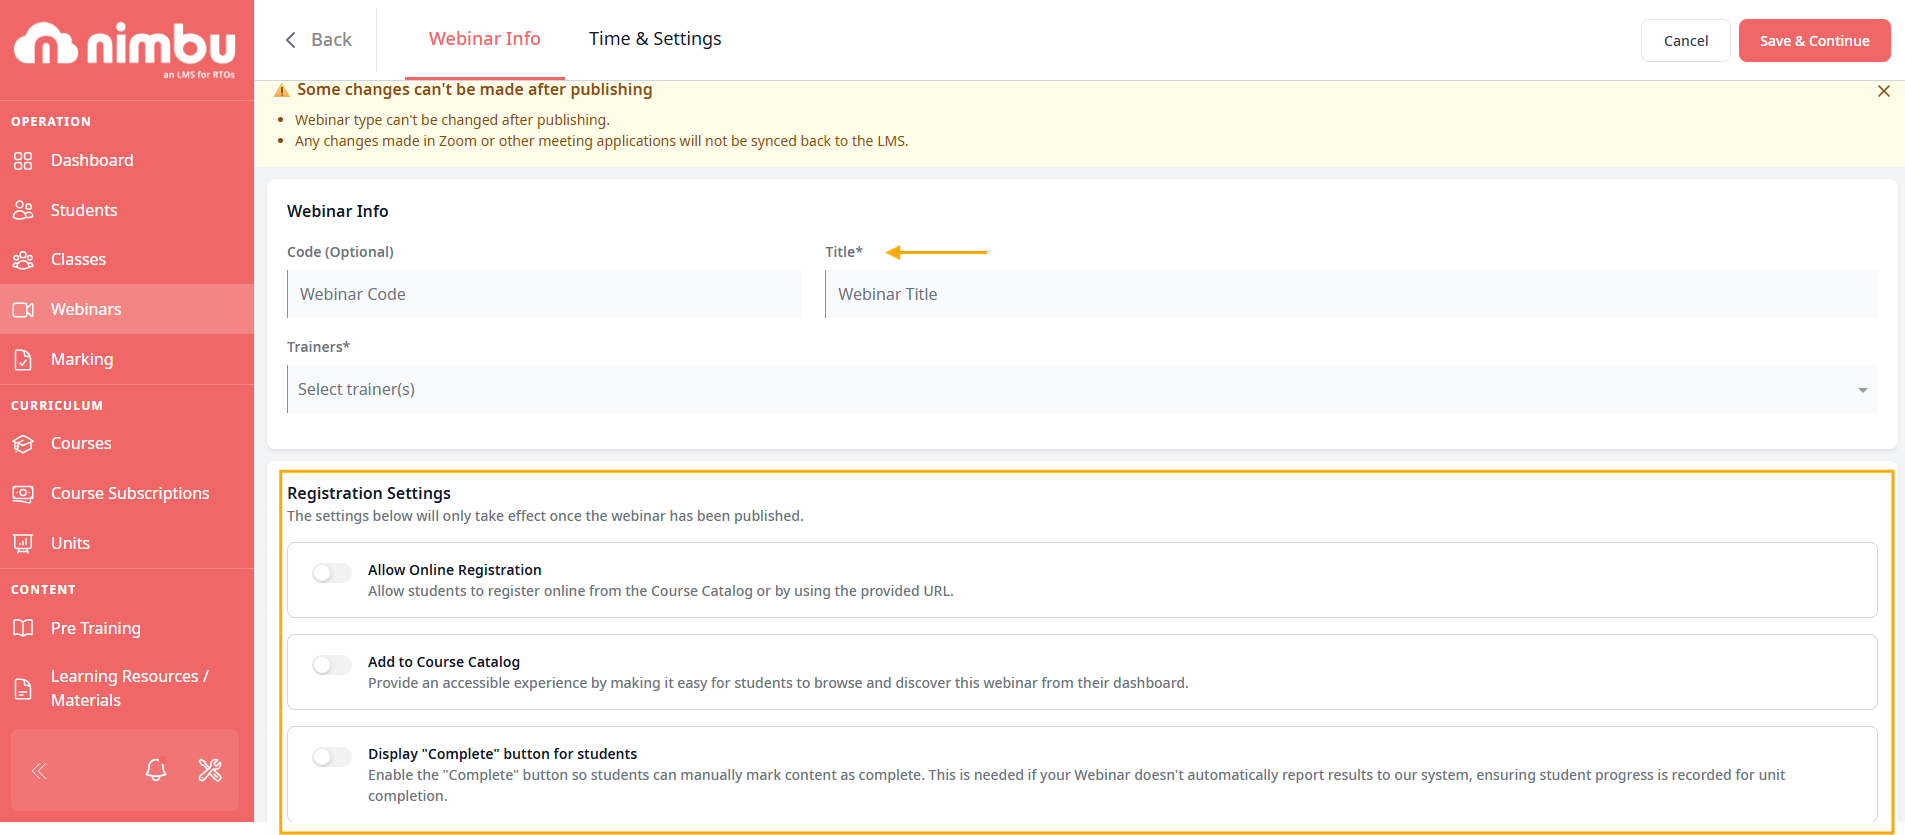
- Configure Registration Settings:
- Allow Online Registration: Enables learners to register via the Course Catalog or a direct URL. When active, the webinar displays a registration link and an optional password, and you can set a Price (Free, Flat Fee, or Subscription / Membership) mirroring the standard course enrolment workflow.
- Add to Course Catalog: Makes the webinar discoverable from the learner-facing Microsite and dashboard.
- Display "Complete" button for students: Lets learners manually mark the webinar as complete. Turn this on if your webinar does not automatically report results back to Nimbu, so that learner progress is still recorded for unit completion.
- Click Save & Continue to move to the Time & Settings tab.
- Choose the hosting type:
- Option 1: Embed External. Paste the URL from a third-party meeting platform such as Google Meet or Microsoft Teams into the Embed Link field. Set the When (date and time), Duration, and Timezone. Optionally enable Recurring Live Lesson.
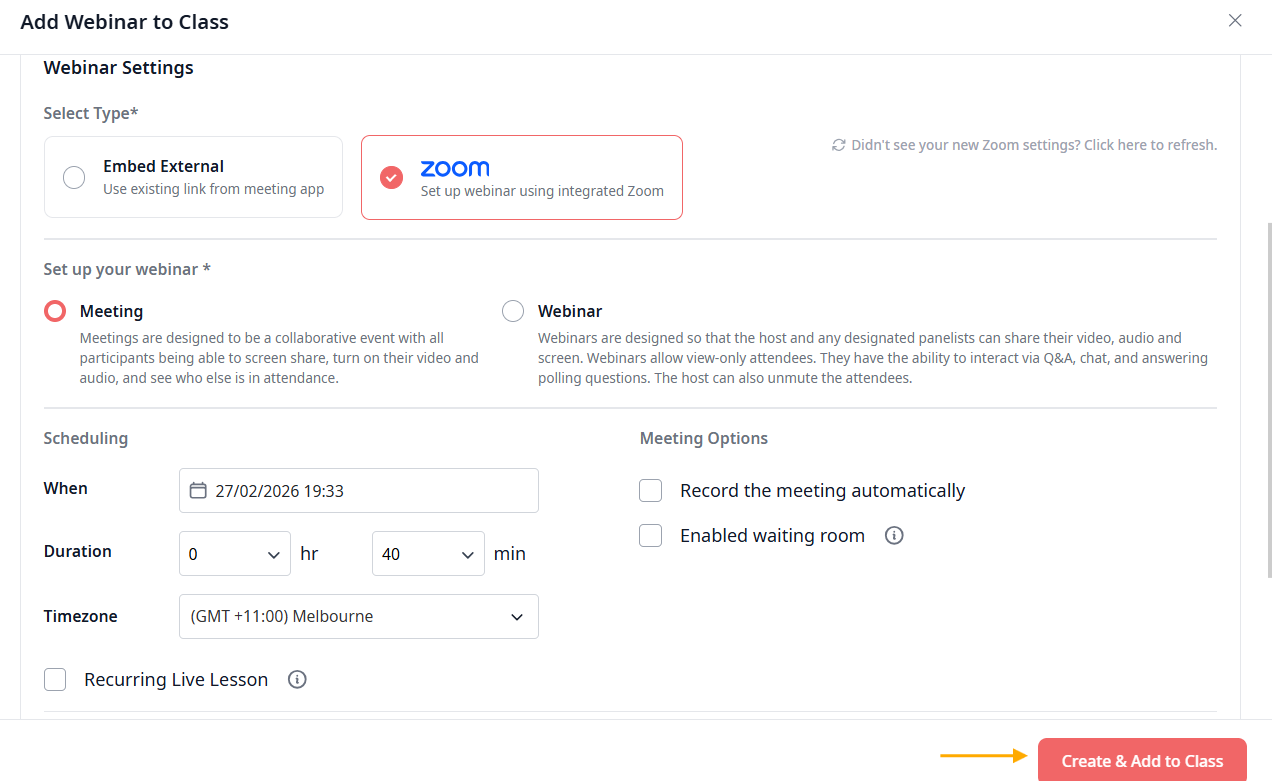
- Option 2: Zoom. Requires a connected Zoom account. Choose a Session Type (Meeting or Webinar), set the Scheduling (When, Duration, Timezone), and optionally enable Recurring Live Lesson. Under Meeting Options you can choose to record the meeting automatically, or enable a waiting room.
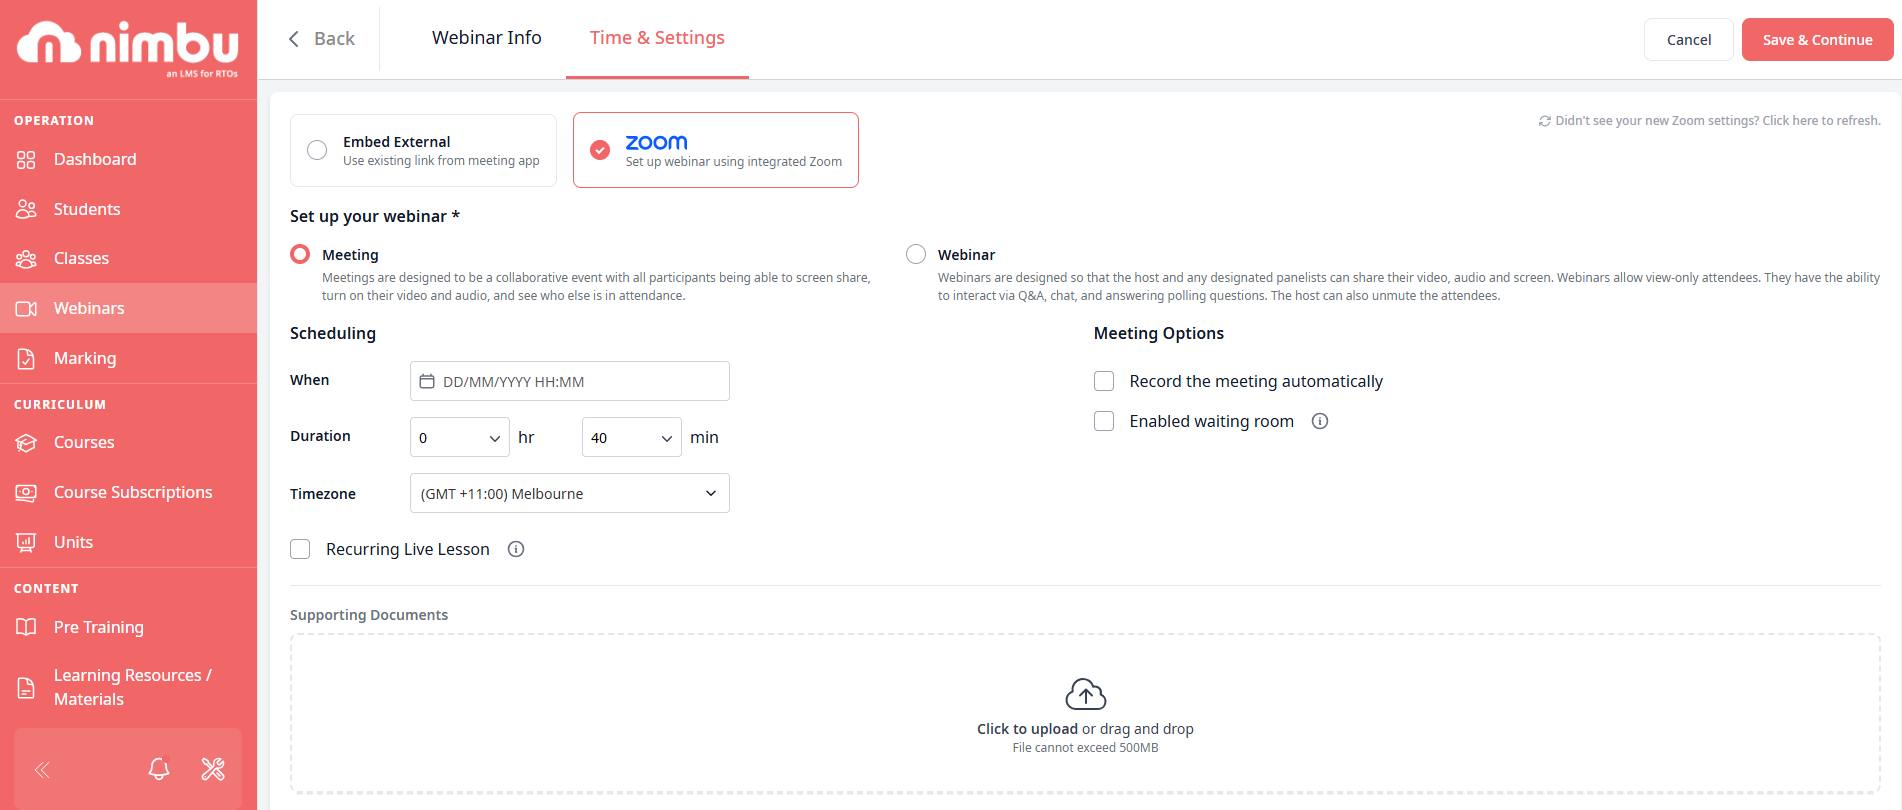
- Optionally add Supporting Documents (max 500 MB per file, visibility set to Trainer Only or Trainer & Student) and Resources (existing or new learning resources for learner access).
- Click Save & Continue. The webinar is saved as a Draft and the Webinar Enrolments page is displayed.
- Review the session in the Preview tab, then click Publish to make it live.
Note: The session type (Meeting or Webinar) cannot be changed after publishing. Always verify the correct timezone before publishing: selecting the wrong timezone will result in learners receiving incorrect invite times. For Zoom-hosted sessions, the Zoom meeting or webinar is only created in Zoom at the moment the trainer clicks Publish.
Meeting vs Webinar in Zoom: A Meeting is designed for collaborative sessions where all participants can share screen, video, and audio. A Webinar is designed for broadcast-style sessions where the host and designated panellists present to view-only attendees, with interaction via Q&A, chat, and polling. Pick based on how interactive the session needs to be.
Adding a Webinar to a Class
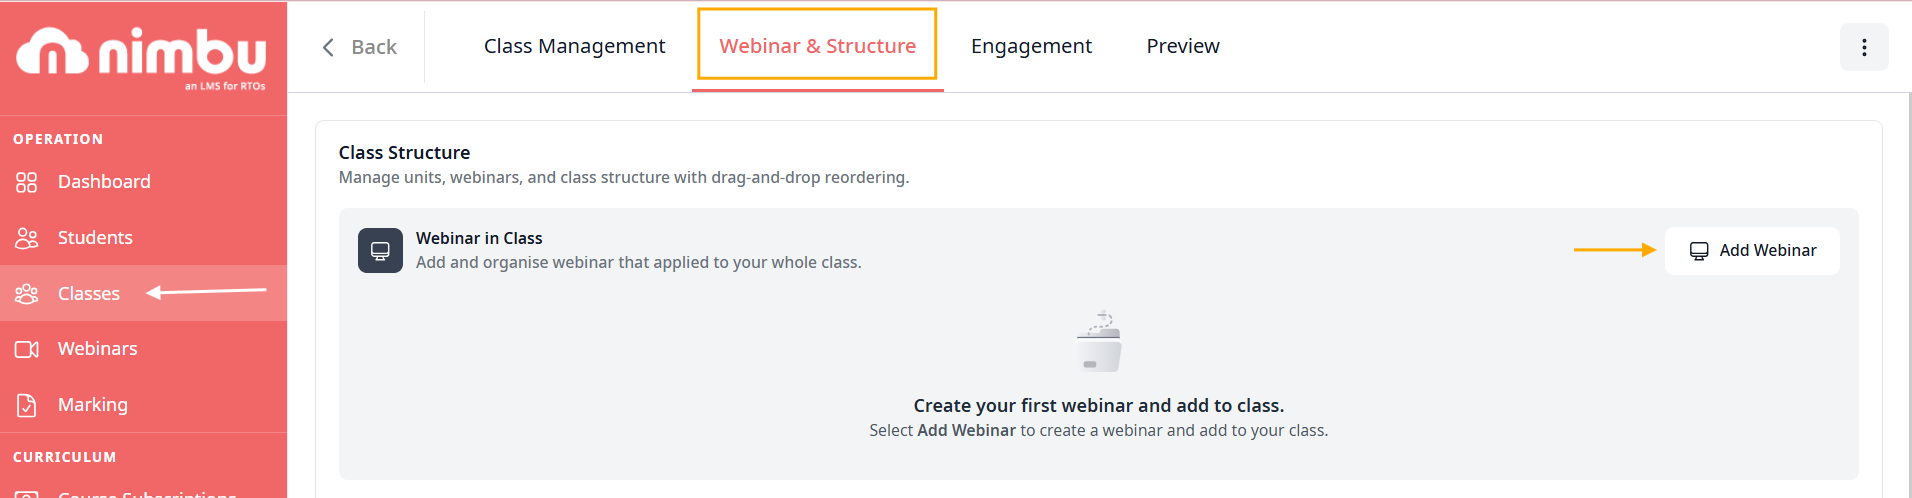
- From the left sidebar, select Classes and open the relevant class.
- Click the Webinar & Structure tab to view the class structure, including units and webinars.
- Under the Webinar in Class section, click Add Webinar.
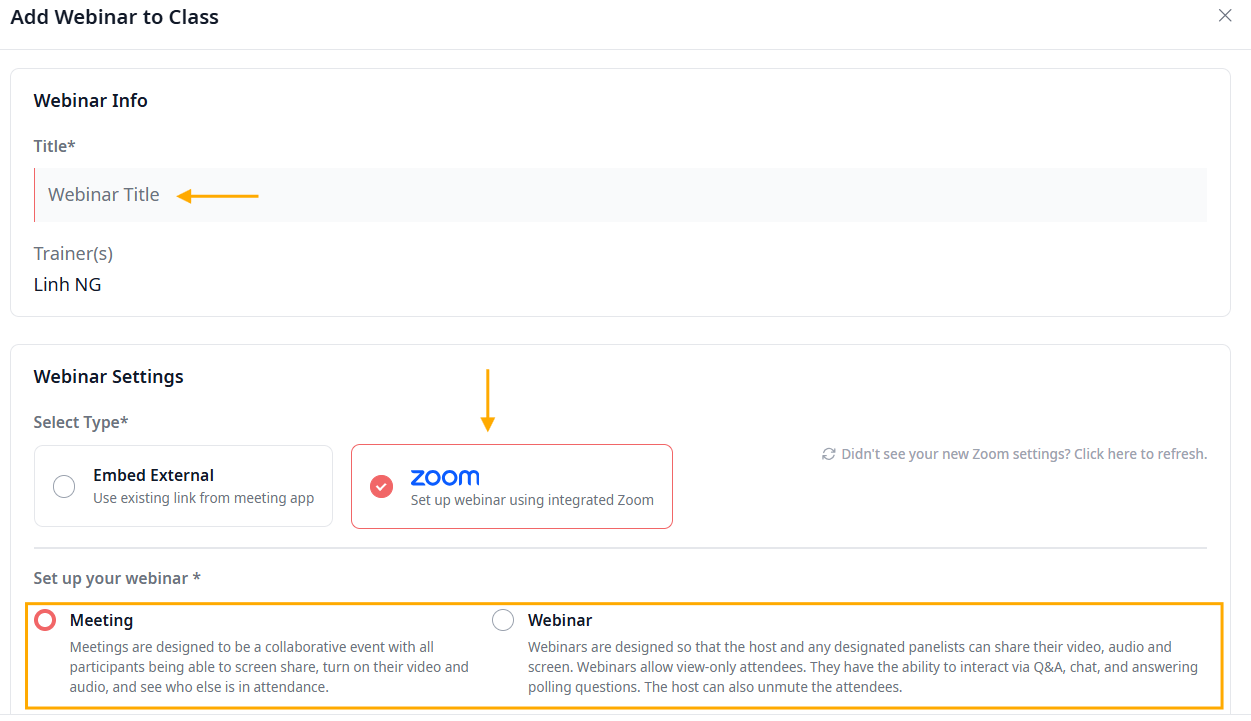
- In the Add Webinar to Class modal, complete the following:
- Title (Required): The name of the webinar.
- Trainer(s): Defaults to the class trainer and can be adjusted.
- Webinar Settings: Choose Embed External or Zoom as the hosting platform.
- Configure scheduling, duration, timezone, and any optional settings (recurring, recording, waiting room).
- Supporting Documents (Optional): Upload reference materials for learners.
- Click Create & Add to Class.
Note: For Zoom webinars added in class, the Zoom session is only created once the class is activated. Learners and trainers are automatically added to Zoom as invitees at that point.
Webinar Statuses
- Draft: The webinar is saved but hidden from learners. All configuration settings can be fully modified at this stage.
- Published: The webinar is active and accessible to enrolled or registered learners. Certain settings (notably session type) cannot be changed once a session is published.
- Inactive: A published webinar that has been disabled. Learners lose access to the session immediately, though the Zoom URL may remain active via the external portal. The session can be re-activated at any time.
Editing and Removing Webinars
- Edit a standalone webinar: From the Webinar Index, click any webinar row to open the Webinar Details edit page. Alternatively, click the Edit button next to the webinar title on its details page.
- Edit a webinar in class: Open the Webinar & Structure tab on the class and use the edit icon next to the webinar. Changes are immediately applied to Zoom (where applicable), the class structure, and the learner-facing view.
- Delete a draft webinar: A Trash icon is displayed on draft webinars for trainers who have the "Can remove webinars" permission.
- Remove a webinar from a class: Use the Trash icon next to the webinar in the Webinar in Class section. A confirmation modal is displayed. Changes are reflected on the class and learner sides.
Changes made directly in the Zoom web portal do not sync back to Nimbu. Always manage session settings from within Nimbu so that the LMS record stays accurate.
Managing Webinars from the Webinar Index
The Webinar Index gives trainers a comprehensive listing of all sessions and supports:
- Search: Locate specific webinars by reference code or name.
- Filter: Refine the list by Status (Draft, Published, Inactive) and Additional Features (for example, Online Registration enabled).
- Edit: Click any webinar row to open its edit page.
- Create: Click Add to open the Webinar Details creation screen.
- Delete Drafts: Trainers with the "Can remove webinars" permission can delete drafts using the Trash icon on the draft row.

Joining a Webinar as a Trainer
The Join button becomes active 30 minutes before the scheduled start time. Trainers can access and join sessions from the following locations:
Standalone Webinar
- Single-event webinar: A Join button is available directly within the webinar row on the Webinar Index.
- Recurring webinar: Clicking Join displays a menu of upcoming sessions for the trainer to select from.

Webinar in Class
- Single-event webinar: The Join button is displayed directly on the webinar row within the Webinar & Structure tab.
- Recurring webinar: Clicking Join provides access to a list of scheduled session instances for selection.

Webinars let your trainers deliver live online sessions without leaving Nimbu, keeping enrolments, completion, and attendance evidence in one system. That means fewer broken links, fewer missed sessions, and a cleaner trail for ASQA audit purposes. Make sure an Admin connects Zoom before your first Zoom-hosted session, and always verify the timezone before publishing.
Related Articles: