How to Add, Use, and Remove the Zoom
Nimbu's Zoom integration allows trainers to create and manage live online sessions, including Meetings and Webinars which are directly within the LMS, without switching between platforms. Once connected, Nimbu automatically generates Zoom invite links and distributes them to enrolled students.
What's Covered in This Article
This article explains how to set up and manage the Zoom integration end-to-end:
- Connecting Zoom to Nimbu: How admins link a Zoom account via Other Integrations
- Creating webinars from the Webinars page: Setting up a Zoom directly from Webinar
- Creating webinars from within a Class: Creating and attaching a Zoom session directly to a specific class
- Disconnecting Zoom: How to remove the integration and what to expect afterwards
Terminology
An explanation of the terminology used within this document:
- Admin (Administrator): A user role with high-level permissions, including managing RTO settings, integrations, and user roles.
- Trainer: A user role with permissions to manage classes and students, including creating and hosting webinars.
- Webinar: A live online session hosted and managed within Nimbu LMS, including Embed External and Zoom.
- Meeting (Zoom type): A collaborative Zoom session designed for full participant interaction.
- Webinar (Zoom type): A broadcast-style session where the host and designated panelists present to view-only attendees
- Waiting Room: A security feature that holds participants in a virtual staging area until the host or co-host manually admits them, preventing unauthorized access. This allows trainers to verify students before they join the session.
- RTO Settings: Organisation-level configuration options accessible by administrators.
- Other Integrations: The section within Nimbu Settings where third-party platform connections, including Zoom, are managed.
Connecting Zoom to Nimbu
This section explains how an admin connects a Zoom account to the platform. Once connected, the integration enables trainers to create Zoom-hosted sessions directly from Nimbu, with invite links generated automatically.
Who can do this: Administrators with the "Can edit integrations" permission, managed under Admin Permissions > RTO Settings.
Prerequisites
Before connecting Zoom, ensure the following:
- The admin account has the "Can edit integrations" permission enabled. This is managed under Admin Permissions > RTO Settings in the user management area.
- A valid Zoom account is available for connection.
How It Works
- From the Nimbu dashboard, click the Settings icon at the bottom of the left sidebar.
- In the Settings menu, navigate to Integrations > Other Integrations.
Locate the "Connect to your Zoom Account" card and click Connect Now.

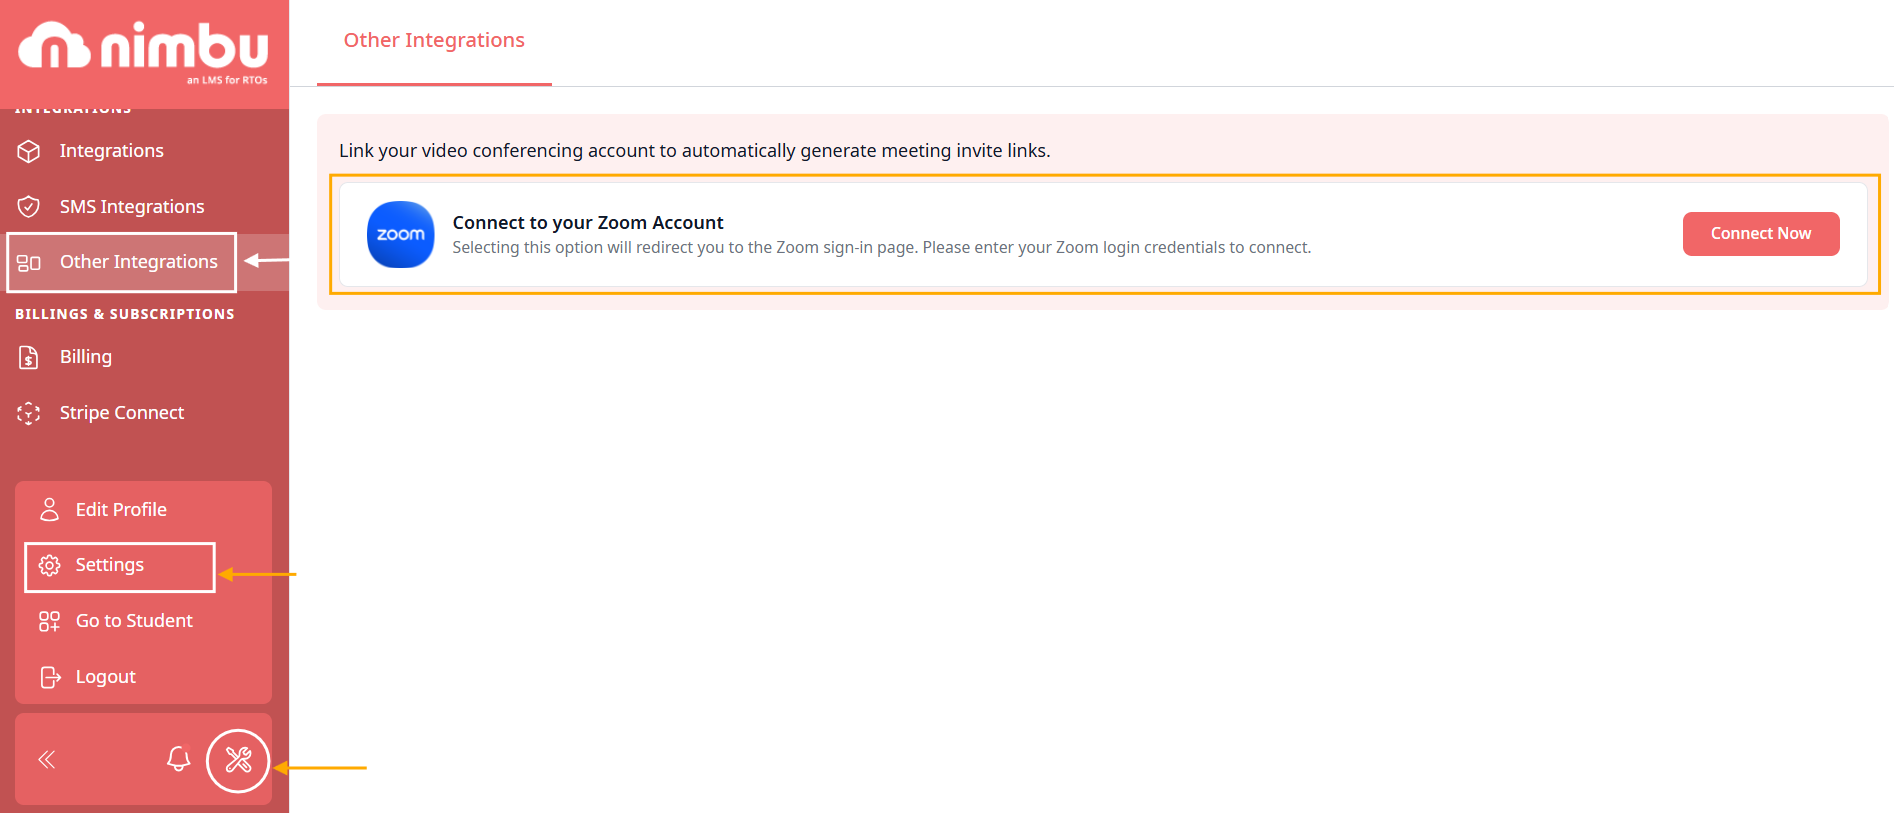
- You will be redirected to the Zoom sign-in page. Enter your Zoom credentials to log in.
- A Zoom permissions screen will appear listing the access rights Nimbu LMS requires, including the ability to create, view, and manage meetings and webinars, view user settings, and access Zoom content data such as messages, transcriptions, and poll responses.
- Click Allow to grant the required permissions and complete the connection.
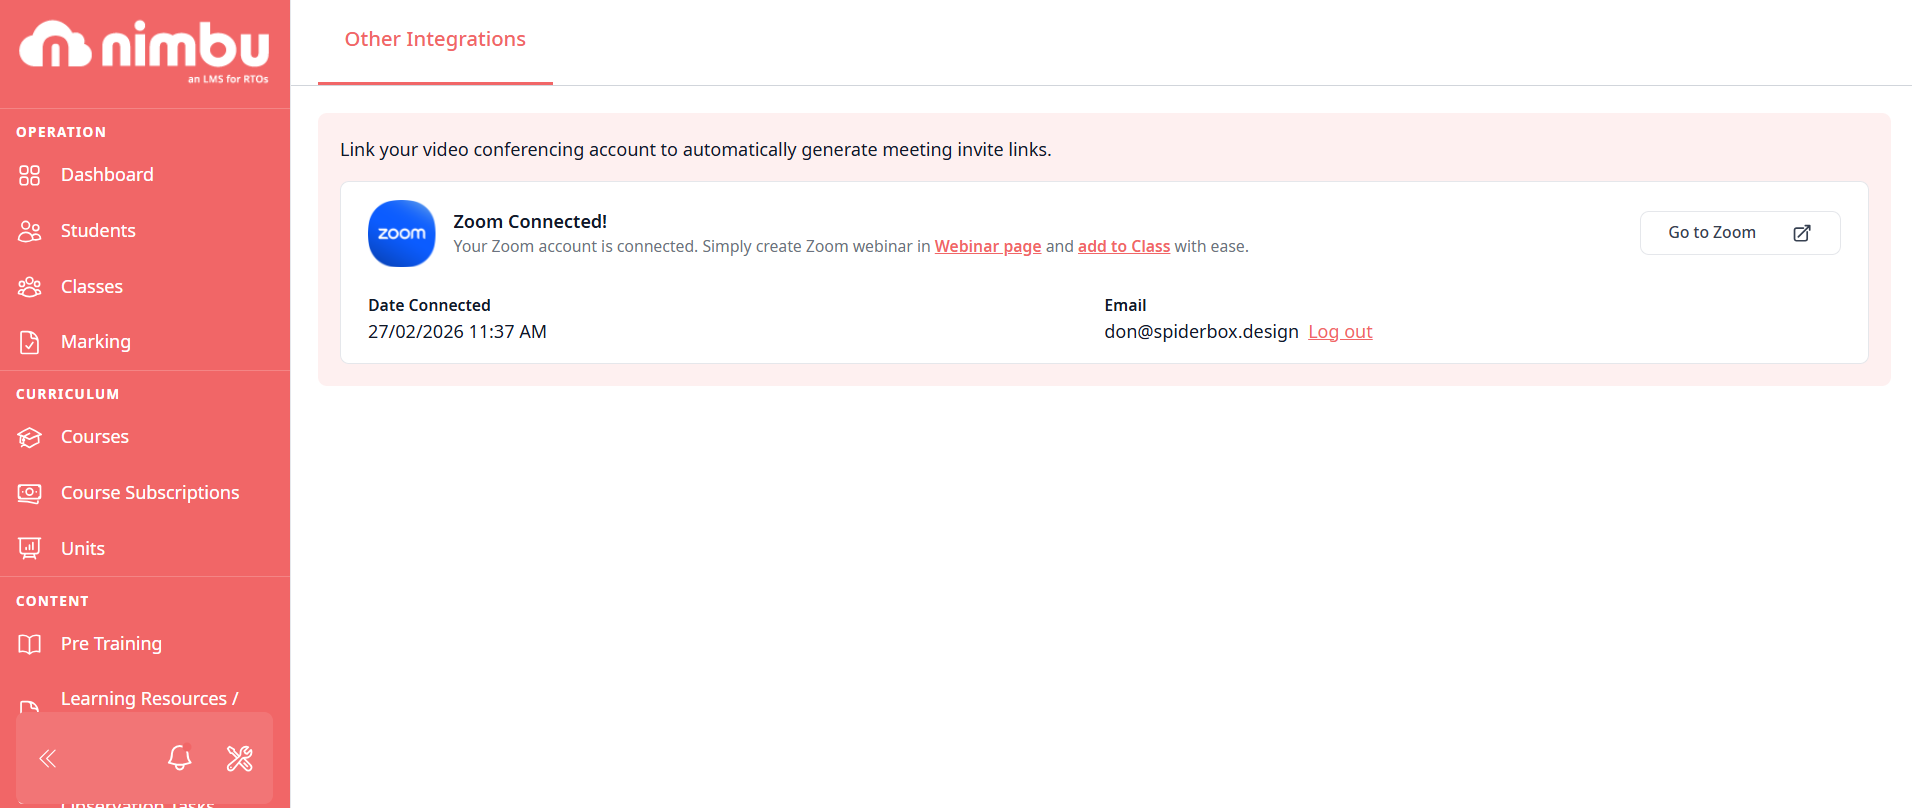
Result: The Other Integrations page will confirm "Zoom Connected!" and display the connection date and the linked email address. You can now create Zoom webinars directly from the Webinar page and add them to a Class with ease.

Creating and Managing Webinars
Once Zoom is connected, trainers can create webinars in two ways. Both methods produce the same result - a Zoom session linked to Nimbu and accessible to enrolled students.
Who can do this: Trainers with Webinar Management permission who are assigned to the relevant class or webinar.
Before you begin: Confirm that an admin has successfully connected a Zoom account via Other Integrations. If Zoom is not connected, the Zoom option will not appear in the webinar setup form.


How It Works
Method 1: Creating a Webinar from the Webinars Page
This method is best when setting up a standalone webinar that can later be linked to one or more classes.
Step 1: Access the Webinars Page: Navigate to Webinars in the left sidebar of the Nimbu dashboard. If no webinars exist yet, the page will prompt you to create your first one.
Step 2: Create a New Webinar: Click the Add button in the top-right corner. A two-tab setup form will appear: Webinar Info and Time & Settings.

Step 3: Complete the Webinar Info Tab: Fill in the required details:
- Code (Optional): An internal reference code for the webinar.
- Title* (Required): The name of the webinar as it will appear to students.
- Trainers* (Required): Select the trainer(s) who will host the session.
- Webinar Description: Use the rich text editor to add a description of the webinar content.
- Webinar Thumbnail: Upload a cover image (JPG or PNG, max 2 MB). A live preview card updates as you fill in details.
Registration Settings:
- Allow Online Registration: Permit students to register via the Course Catalog or a provided URL.
- Add to Course Catalog: Make the webinar discoverable from the student dashboard.
- Display "Complete" button for students: Allow students to manually mark the webinar as complete. Recommended when Zoom does not automatically report completion back to Nimbu.
Trainers should use the "Allow Online Registration" and "Add to Course Catalog" toggles to manage student discovery and enrollment securely.

Step 4: Complete the Time & Settings Tab
Configure the session type, scheduling, and additional options:
- Select Zoom as the hosting platform.
- Choose the Zoom session type:
- Meeting: A collaborative session where all participants can interact freely with screen sharing, video, and audio.
- Webinar: A broadcast-style session where the host and panelists present to view-only attendees, who can interact via Q&A, chat, and polls.

- Set the session details for scheduling:
- When: Select the date and start time (DD/MM/YYYY HH:MM).
- Duration: Set the session length in hours and minutes.
- Timezone: Select the applicable timezone. Always verify that the correct timezone (e.g., GMT +11:00 Melbourne) so students receive accurate invite links.
- Recurring Live Lesson (Optional): Enable this option if the session repeats on a regular schedule.
- Choose meeting options:
- Record the meeting automatically: While sessions can start recording automatically, participants will be notified upon entry to comply with privacy laws.
- Enable waiting room: Holds participants in a waiting room until the host admits them. Recommended for student privacy.
- Supporting Documents (Optional): Upload any reference materials for students to access alongside the session (max file size 500 MB).
Step 5: Add Students: After clicking Save & Continue, you will be directed to the Webinar Enrolments tab. Click Add Student to manually add or import students to the webinar.

Step 6: Publish the Webinar: Click the Publish button in the top-right corner and confirm when prompted. Enrolled students will receive their Zoom invite links automatically.

Result: The webinar is published and active. Students can access the session and receive Zoom meeting links directly through Nimbu.
Method 2: Creating a Webinar Directly from a Class
This method is best when you want to create a webinar and immediately attach it to a specific class in one step.
Step 1: Access the Class: Navigate to Classes in the left sidebar and select the relevant class.
Step 2: Go to the Webinar & Structure Tab: Within the class, click the Webinar & Structure tab. This page displays the Class Structure, where you can manage units, webinars, and the overall learning structure using drag-and-drop reordering.
Step 3: Add a Webinar: Under the Webinar in Class section, click the Add Webinar button on the right. An "Add Webinar to Class" modal will appear.

Step 4: Fill in Webinar Info: In the "Add Webinar to Class" modal, complete the following:
Webinar Info
- Title* (Required): The name of the webinar.
- Trainer(s): Displays the assigned trainer(s) for the class.
Webinar Settings: Select Zoom as the hosting platform:
- Choose the Zoom session type:
- Meeting: A collaborative session where all participants can interact freely with screen sharing, video, and audio.
- Webinar: A broadcast-style session where the host and panelists present to view-only attendees, who can interact via Q&A, chat, and polls.
- Set the session details for scheduling:
- When: Select the date and start time (DD/MM/YYYY HH:MM).
- Duration: Set the session length in hours and minutes.
- Timezone: Select the applicable timezone. Always verify that the correct timezone (e.g., GMT +11:00 Melbourne) so students receive accurate invite links.
- Recurring Live Lesson (Optional): Enable this option if the session repeats on a regular schedule.
- Choose meeting options:
- Record the meeting automatically: While sessions can start recording automatically, participants will be notified upon entry to comply with privacy laws
- Enable waiting room: Holds participants in a waiting room until the host admits them. This allows trainers to verify students before they join the session.
Supporting Documents (Optional): Upload any reference materials for students to access alongside the session (max file size 500 MB).

Step 5: Create and Add to Class
Click Create & Add to Class to finalise. The webinar is immediately created in Zoom and added to the class structure.

Result: The webinar is listed in the Class Structure with its title, schedule, and duration. Click the Preview tab to see how it appears to students, including the Zoom badge and session timing.
Disconnecting Zoom
To remove the Zoom integration from Nimbu:
- Click the Settings icon at the bottom of the left sidebar.
- Navigate to Integrations > Other Integrations.
- On the Zoom Connected card, click Log out next to the connected email address.

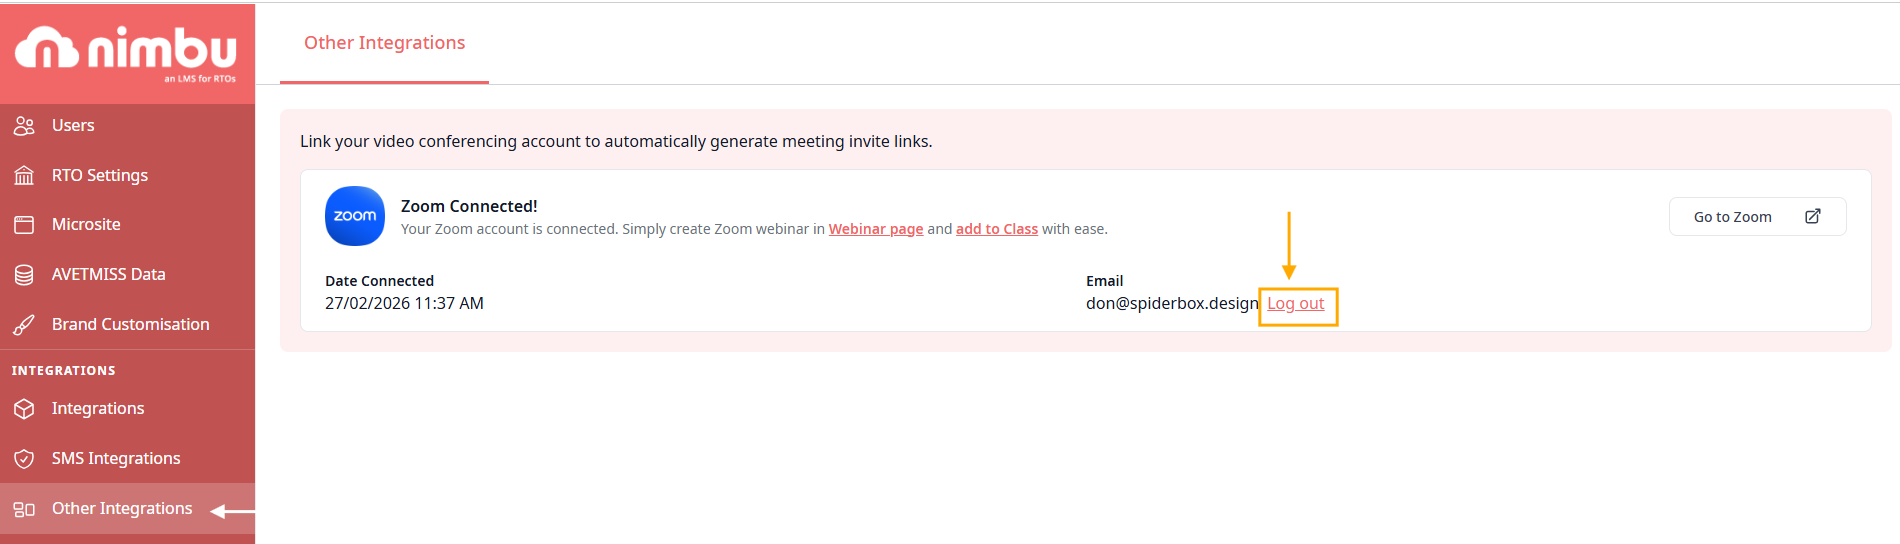
Result: The Zoom account is unlinked from Nimbu immediately. While previously created webinars are not deleted and cloud recordings/ reports remain accessible via your Zoom Web Portal, new sessions cannot generate Zoom links until an account is reconnected. Please note that existing links already distributed to students may lose synchronisation features with the LMS once the connection is terminated.
Important Notes
- Only one Zoom account can be connected to Nimbu at a time. To switch accounts, disconnect the current one and reconnect with the new credentials.
- The webinar session type (Meeting or Webinar) cannot be changed after publishing. Plan your session type before publishing.
- Changes made directly in the Zoom app or Zoom portal will not sync back to Nimbu. Always manage session settings from within Nimbu to ensure consistency.
- If your Zoom plan does not include the Webinar feature, only the Meeting option will be available.
- Always verify the correct timezone when scheduling sessions. Selecting the wrong timezone will result in students receiving incorrect invite times.
- The "Display Complete button for students" setting is recommended when Zoom does not automatically report completion data back to Nimbu. This ensures student progress is recorded for unit completion tracking.